So you want to learn how to make kombucha from scratch. Good choice. It’s one of those kitchen projects that feels like a magic trick the first time you pull it off. You buy a plain bottle of store-bought kombucha, pour in some sweet tea, and a few weeks later you have this wobbly, tan disc floating in your jar. That’s your SCOBY, short for symbiotic culture of bacteria and yeast. And honestly? It’s kind of ugly at first. But once you’ve got one, you can brew batch after batch all year long. I started mine in late spring because the warmer temps speed things up, and by summer I was drowning in fizzy, fruity kombucha. Not a bad problem to have.
Look, a lot of guides make this sound complicated. They tell you to find a SCOBY online or beg one from a friend. But here’s the thing: you can grow your own from a simple bottle of unflavored kombucha. No special equipment, no expensive starter kits. Just tea, sugar, a clean jar, and patience. The process is basically controlled rotting, but in a good way. I promise.
Why a Store-Bought Bottle Works as a Starter
That bottle of plain kombucha at the grocery store is alive. It contains the same bacteria and yeast that form a SCOBY. When you add it to sweet tea, the microbes wake up, start feeding on the sugar, and produce cellulose. That slimy layer on top is their little home. Gross but beautiful.
Not all store-bought kombuchas are equal though. Avoid anything flavored, especially with fruit pieces or added oils. Those can mess with the culture or introduce mold. You want raw, unflavored kombucha. Check the label for “raw” and “unpasteurized.” A brand like GT’s original is a solid bet, but honestly any plain live one works. I once used a local grocery chain’s house brand, and it turned out fine.
One weird little thing: if your bottle has been sitting in the fridge for months, it might be sluggish. Let it sit at room temperature for a day or two before using. Give those microbes a chance to stretch their legs.
Your First Batch: Growing the SCOBY from Scratch
Here’s the super simple process. You’ll need a large glass jar (half gallon is perfect), a cloth cover (coffee filter or kitchen towel), a rubber band, a pot, and your ingredients. The recipe is loose, but I stick to about 1 cup of white sugar per gallon of water, plus 8 to 10 tea bags. Black tea is best for beginners because it’s stable and consistent. Green works too, but it’s more delicate.
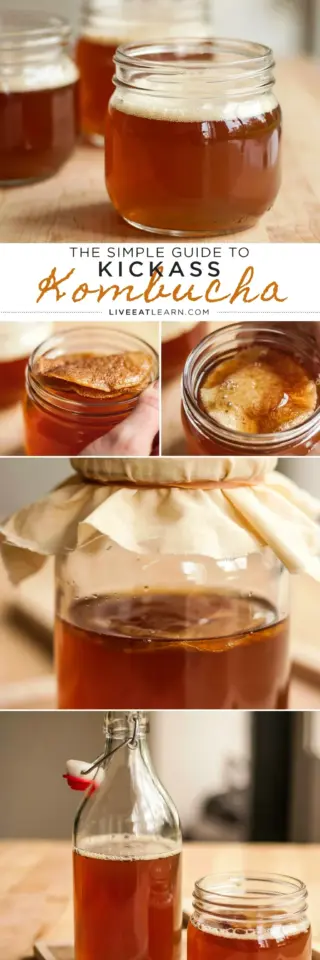
Boil your water, steep the tea, dissolve the sugar, and let it cool completely. If it’s even a little warm, you’ll kill the good guys. Then pour the sweet tea into your jar, add your store-bought kombucha (maybe a cup or so), cover with the cloth, and forget about it for 10 to 14 days. Put the jar somewhere room temperature, out of direct sunlight. Somewhere you won’t bump into it every day. I keep mine on top of the fridge because it’s warm there and I never notice it.
After about a week, you’ll see a thin film forming on the surface. That’s the baby SCOBY. By day ten, it should be about a quarter inch thick. It’s a bit lumpy and imperfect. That’s normal. If it’s fuzzy or green, toss it. But if it’s off-white or tan with brown stringy bits, you’re golden. The brown bits are just yeast strands, totally fine.
When to Know the SCOBY Is Ready and the Brew Is Done
You can’t rush this part. Your first batch might take two full weeks or even three, especially if your kitchen is cold. The main sign is taste. Stick a clean straw in and take a sip. If it’s still sweet, let it go longer. If it’s tangy and slightly sour, with a faint vinegar note, it’s ready. The SCOBY itself should be at least as thick as a stack of two to three coins. Not strong? Wait. Go by taste, not by the calendar.
Also, look for bubbles. A healthy brew releases tiny bubbles that cling to the sides of the jar. If you see a single big pocket of CO2 trapped under the SCOBY, that’s fine. Just poke it with a clean spoon to release it. Or don’t, it doesn’t matter. I accidentally left one batch for three weeks once, and it turned into straight vinegar. Too sour to drink but perfect for salad dressing. So there’s no real failure, just a different product.
- Test for doneness: It should be pleasantly sour, not cloying sweet.
- SCOBY thickness: Aim for 1/4 inch or more. Thinner means it’s still young.
- Smell: Should be yeasty and sharp. If it smells like rotting garbage, something’s wrong.
- Visual check: No mold (fuzzy patches in green, black, or pink). Brown stringy yeast strands are fine.
Second Ferment: Where the Fruity Magic Happens
Once you’ve got your first batch of plain kombucha and a healthy SCOBY, you can move on to the fun part. The second ferment (or 2F) is when you add flavor and fizz. It’s the part that turns a boring tea into something you actually want to drink. Personally, I’m obsessed with fruity flavors. Mango and ginger is my go-to, but I’ve also done strawberry basil and peach lavender. One time I added a handful of frozen blueberries and a slice of lemon, and it came out like a carbonated berry soda. Not gonna lie, I felt like a mad scientist.
To do a 2F, you need airtight bottles. Swing-top bottles (like the ones Grolsch beer comes in) are perfect. You can reuse commercial kombucha bottles, but the seal might not hold as much carbonation. Fill each bottle about 80% with your plain kombucha, leaving space for your fruit additions. For real carbonation, use fresh fruit or puree, not juice. Bits of fruit give the yeast something to feast on, which produces more CO2. Just don’t overdo it. A tablespoon of fruit puree per cup of kombucha is plenty.
Seal the bottles and leave them at room temperature for 2 to 4 days. Then pop them in the fridge. The cold stops fermentation and calms the fizz. Open outside the first time. Seriously. I learned the hard way when a strawberry kombucha exploded on my kitchen ceiling. It looked like a crime scene.
Troubleshooting Common Kombucha Problems (Yes, Everyone Gets at Least One)
Let’s be real. Not everything goes smoothly. Your SCOBY might sink to the bottom. That’s fine, it will float again eventually. Or you might get a fizzy brew that’s too sour. That means you let it ferment too long. Next time, taste earlier. Or you might get zero bubbles in the bottle, which means your carbonation failed. Usually that happens because the fruit wasn’t sugary enough or the bottle wasn’t sealed well. Try adding a tiny pinch of sugar to feed the yeast next time.
Then there’s mold. This is the scary one. Honestly, if you keep everything clean and your starter is strong, mold is rare. But if you see green or black fuzz on top of the SCOBY, throw the whole thing out. Do not try to save it. Wash your jar thoroughly with hot water and dish soap, and start over. Don’t use antibacterial soap because it leaves residue that can kill the culture. Just hot water and good scrubbing.
One more thing: temperature swings. If your house gets cold at night, the fermentation slows down. That’s fine, just takes longer. But if you keep your jar near a radiator or in direct sunlight, you’ll get a weirdly fast, stressed fermentation that tastes like nail polish remover. Keep it steady, about 70 to 80 degrees Fahrenheit. My kitchen is drafty, so I wrap the jar in a towel at night during winter.
Why This Time of Year Is Perfect to Start Brewing
I’m writing this in early spring, and honestly, that’s the ideal time to begin. The days are getting longer, the air is a bit warmer, and your SCOBY will grow faster than in winter. If you start now, you’ll have at least two or three batches established before summer hits. And summer is the peak time for flavor experiments: fresh berries, ripe peaches, melons, garden herbs. Mint and lime is another killer combo. By June you’ll be giving bottles away to friends. They’ll pretend to be excited, but secretly they’ll love it.
Plus, kombucha is seasonal in a weird way. In winter I tend to brew darker, spicier flavors like chai or cinnamon. In summer I go light and bright. Having a continuous batch system means I can switch flavors every week. That’s the real joy of homemade kombucha: you control everything. Want it super sour? Ferment longer. Want it sweet and fizzy? Bottle it early. You’re the boss.
So grab a bottle of plain kombucha on your next grocery run. Wash a big jar. Make some tea. And give it a shot. Worst case, you end up with a jar of vinegar and an interesting story. Best case, you never buy kombucha from the store again. Pretty good gamble if you ask me.
Now go brew something. And when you crack open that first fizzy mango bottle, think of me. I’ll be drinking my own, probably with a little splash of bourbon. Don’t judge.
#Kombucha #KombuchaBrewing #HomemadeKombucha #SCOBY #Fermentation
Leave a Comment